Home Office Automation
I built a little digital Rube-Goldberg device for my office. When I turn my desk power switch on, a little microcontroller brings my workstation and stereo online.
My desk has a keyboard and monitor, but no computer. The computer lives in the closet a few feet away. Also in this closet is my stereo which drives audio to for the office. This makes my desk cleaner and quieter, but makes it hard to hit the power buttons.
When arranging devices in the closet, I install everything rear-facing for easier cable access. This presents a problem, though, because most devices have their control panels on the front, not the back, and are now facing the rear of the closet and are inaccessible.
I now use IPMI and HTTP to control my devices. The journey to achieving this was pretty fun.
Workstation Power Control
Having the control panels inaccessible is kind of annoying, but as I have been tinkering with electronics, I made a solution to my control panel problem.
A story for another time is how I managed to ruin two desktop motherboards trying to add remote power switching to my workstation. My current workstation has an old server board inspired by my coworker’s setup using old Xeons.
For controlling power over IPMI, I found two decent options. First, there are IPMI mobile apps. Second, running ipmiutil on another computer. I used a mobile app for a few days, but I still felt it was lacking. For context, my stereo is also network-connected and can be controlled by a different mobile app. My start-work routine became fumbling around doing a few dozen taps across two apps to bring my office online.
Stereo Remote Control
My stereo is mounted in the closet above my workstation, also rear-facing, and has similar challenges to my workstation: the control panel is in the front.
Fortunately, my stereo (Denon AVR-720w) is networked and can be controlled remotely. In researching, I found two network control methods: First, the Denon AVR control protocol which is over a telnet/tcp interface. Second, the mobile app, which uses HTTP calls. The HTTP API appears to be undocumented, but Wireshark made it easy to study.
After gathering an understanding of the Denon HTTP API, it was time to start writing code.
Office Control
Objective: When I turn on my desk power switch, I want my workstation and stereo to come online.
I purchased an ESP32 development board and got to work. As for platforms, I find Arduino to be the most common, but ESP32 and ESP8266 boards support other development platforms. I found Mongoose OS suited my needs pretty well as it let me write C++ and had an event-driven execution model - both of which I found useful when writing complex (for an MCU) programs later.
I wasn’t able to find any IPMI libraries for Arduino nor Mongoose OS. Further, I couldn’t find any Denon AVR control libraries, either.
Networking with Denon AVR
Wireshark showed me that the iPhone Denon app uses SSDP (HTTP over UDP) to discover a local Denon AVR. Fortunately, the Mongoose OS HTTP API just works over UDP multicast! I don’t know if this is intended, but I am thankful it works :)
mgos_connect_http("udp://239.255.255.250:1900", ssdpCallback, this);
Once discovered, we can use normal HTTP (over TCP) to talk to the Denon AVR. There’s an HTTP endpoint that accepts the same commands as described in the Denon AVR control protocol:
http://<address>:80/goform/formiPhoneAppDirect.xml?<command>
I had 3 commands I wanted to run: power on (PWON), set input to my workstation (SIGAME), and set volume to 50 (MV50).
Complications and Workarounds
I found I could softlock my stereo if I sent these control commands (power on, etc) too quickly. Recovering from softlock required me to reseat the power plug in order to reset the network system on the stereo :(
To work around this softlock, I had to implement a queue with a 40ms delay between commands.
Networking with IPMI: First Attempt
IPMI is a pretty complex protocol, and because I couldn’t find any Arduino or Mongoose OS libraries, I thought I may have to write my own. When glancing at the IPMI spec, I felt it wasn’t worth my time to implement given the complexity.
Without direct IPMI access, what to do? Well, I have a Raspberry Pi monitoring my house’s power usage, and there is a well-maintained ipmiutil tool which runs on Linux. Additionally, Mongoose OS has MQTT support which makes this easy to glue together.
Using Node-RED, I glued together a workflow that would receive a “power on” message from an ESP32 over MQTT to the Rasbperry Pi which runs ipmiutil to boot my workstation.
Success! It required cooperation of two devices (Raspberry Pi and ESP32), though.
Networking with IPMI: Standalone
Fast-forward a few weeks, and I was itching to eliminate the two-device implementation.
To do this, I needed to write an IPMI client implementation that could run on my ESP32. I looked at ipmiutil and ipmitool and both codebases gave me the feeling it would take too much effort to port to ESP32. Besides, all I wanted was to send power on/off signals.
So, I download the IPMI spec from Intel and start reading, as one does. If you are interested, the most relevant sections for power control are “6. IPMI Messaging Interfaces”, “13. IPMI LAN Interface”, and “22. IPMI Messaging Support Commands”.
Ultimately, I wanted to invoke the “Chassis Control Command” to tell the machine to boot, which requires setting up a session and authenticating.
The most time I spent implementing this was in two places: IPMI’s bespoke MD5 authentication and misunderstanding byte order. Wireshark was critical in helping me understand the protocol. For byte order, it may please you to learn that IPMI uses both little and big endian, quoting the spec:
RMCP and ASF-specified fielsd are therefore transferred most-significant byte first.
IPMI Session Header and IPMI Message fields are transmitted least-significant byte first.
😭 Mixing both big- and little-endian 😭
After I read the spec more closely, I was able to resolve my wayward stumbling.
The spec is large, and my needs are small, so I have only the bare minimum to achieve “Hey workstation, wake up!”
Improving Development w/ Mongoose OS
As an aside, I knew implementing IPMI would be take serious effort. Deploying to a microcontroller is a slow process, and debugging them is hard, so I wanted to find a better way to implement this without losing energy to the microcontroller development tooling. (To be fair, Mongoose OS has some pretty good tooling for heap analysis and hooking into gdb)
Mongoose OS uses a network library based on Mongoose, and Mongoose runs on multiple platforms. The APIs are similar enough that I could target Mongoose on Linux and have confidence that it would work well on Mongoose OS.
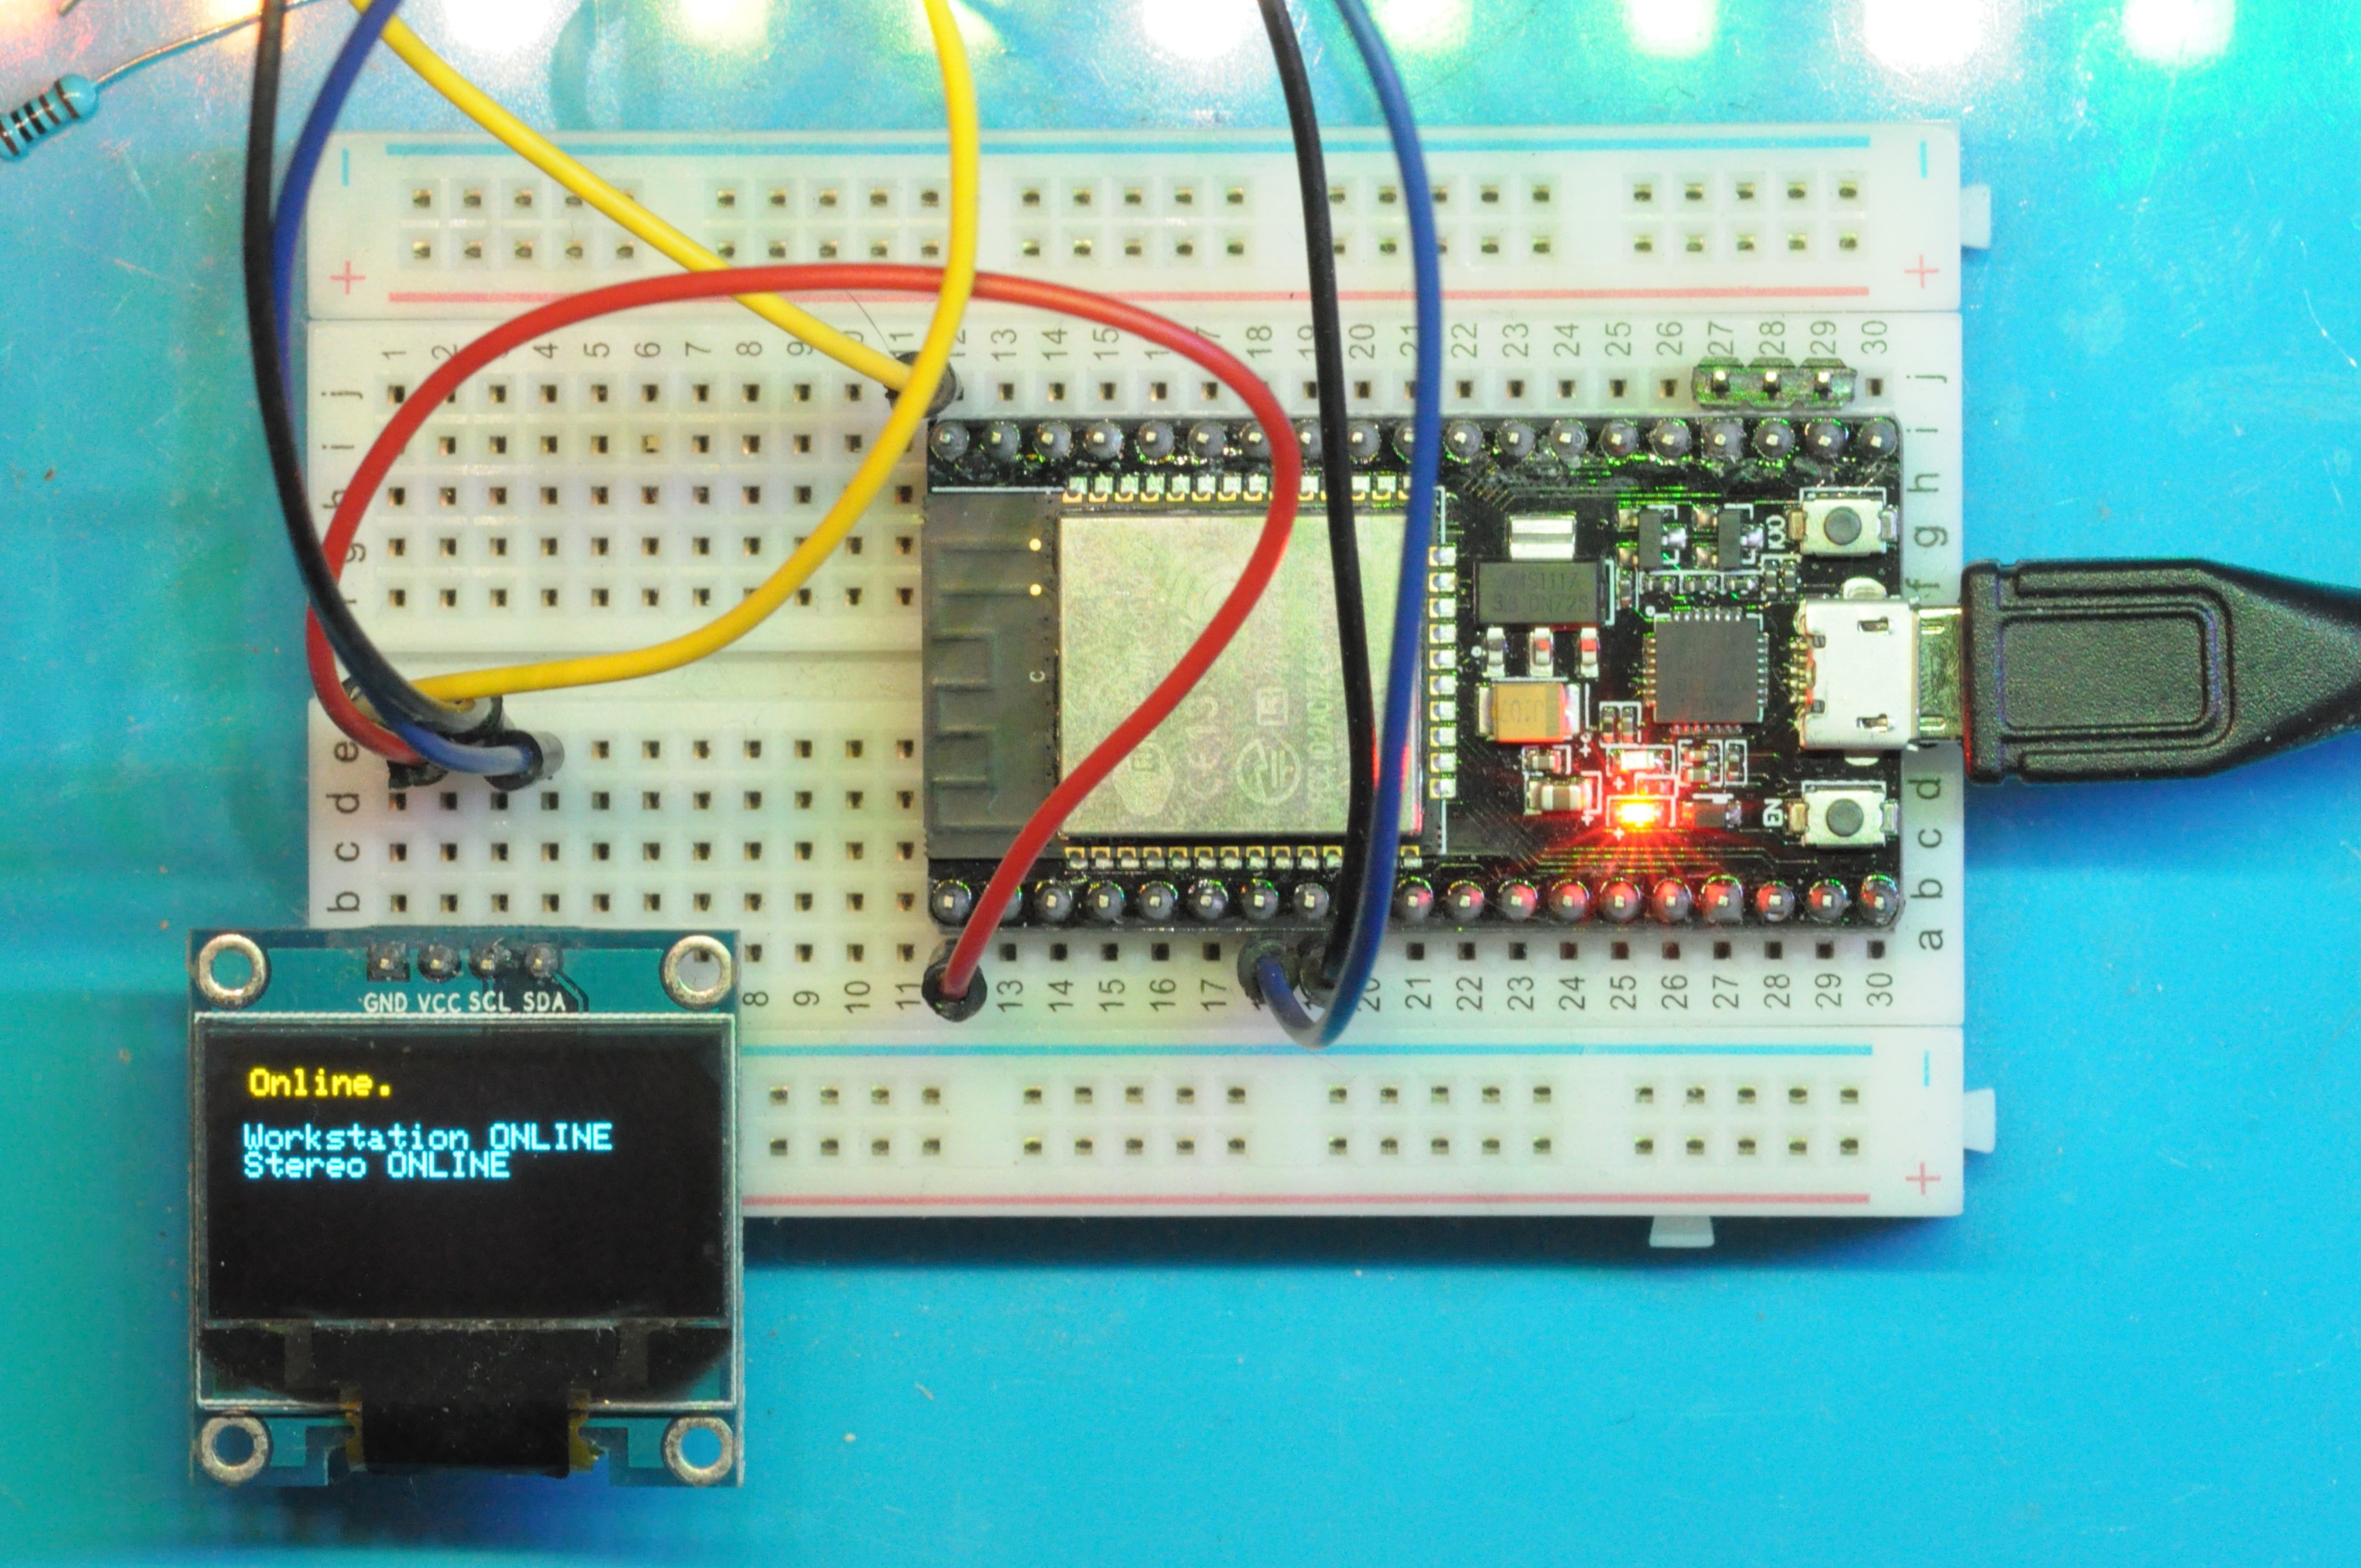
Adding a Display
With all the activity this little MCU was doing, I felt it needed a display to give me status.
You can get tiny, monochrome displays from ebay or aliexpress for about $2. The one I have uses I2C.
For the display, I used the Adafruit SSD1306 Arduino library (ported to Mongoose OS).
The Result
I have a power strip on the wall near my desk that drives my monitor and usb hub. When I turn it on, the ESP32 joins wifi and wakes my workstation and stereo. One switch now controls makes my whole office come online.
Code
So far, the IPMI library is only able to do chassis control (power on, off, etc) and is ~1200LOC. The Denon AVR library is about ~140LOC. I haven’t written any automated tests, unfortunately. I haven’t really used C++ for anything significant before, and I’m happy with the result.
There are two repositories I wrote for this project. Both are C++: